|
Table LayoutFor your first webpage, we will be using a table layout. In other words, we construct a table with rows and columns of cells. Inside those cells, we will be placing images and content. In the early days of web design, all pages are laid out using this table layout method. In today's web design, many sites are no longer using this technique and are using CSS layout instead. Because both method has its pros and cons, I believe that one should know both method and use the method best suited for the individual design. I do teach the CSS layout method in the Intermediate design series. However, in the Intro Design Series, I think it is best to learn the table method first because it is easier learn and it is faster to build and you don't run into all the cross-browser compatibility problems with the CSS layout technique. When you become more comfortable with building web pages, then I would encourage you to learn the CSS technique in my Intermediate Design Series courses. Using the Comp FileIn order to build the site with the exact dimensions as the Fireworks comp, we need to open up the creativeworks.png file that is in the assets folder using Macromedia Fireworks. And in order for our images to fit together perfectly, we need to have pixel perfect accuracy. From this Fireworks file, we need to determine the width of our web page and that will determine the width of our table.
With guides turned on and set to be inside the borders, we double-click on them to see that the right guide is at 779 and the left guide is at 21. This gives us an inner width (excluding the borders) to be 758.
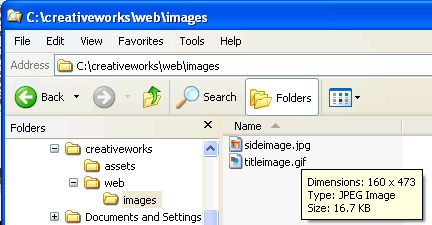
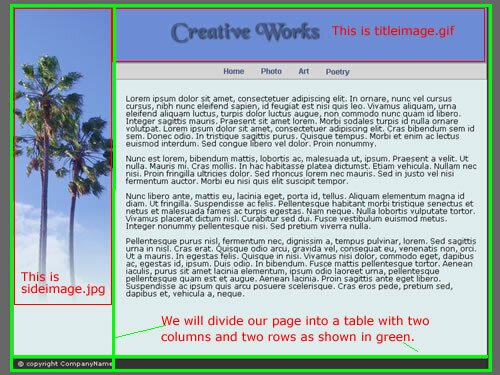
If you pause your mouse over our two image files in Window Explorer, you will see that the sideimage.jpg has a width of 160 and titleimage.gif has a width of 598. So the two images laid side-by-side will be 758 pixels wide -- exactly the width of our page. The confirms the correctly of the width of our page. Dividing the PageSince we want our table cells to hold our images, we divide our page into table cells as shown.
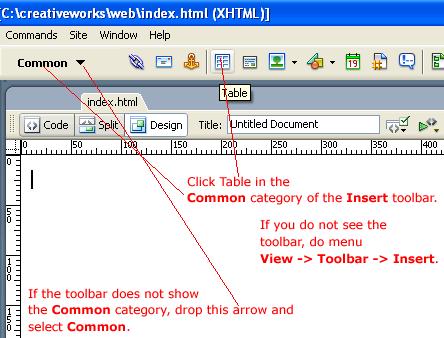
So far we have an empty index.htm page. Switch to the Design View and insert a table of 2 columns and 2 rows through these steps...
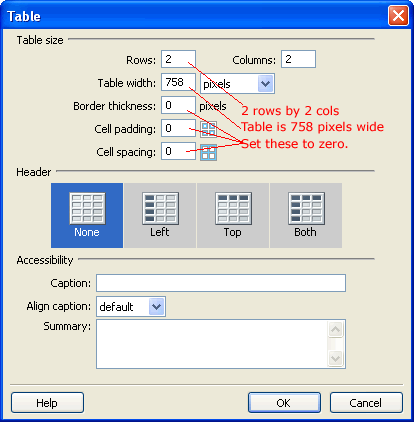
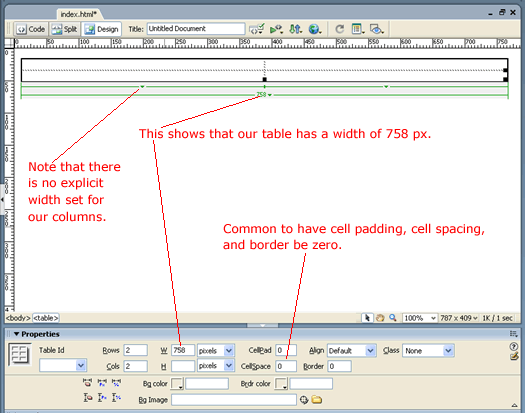
The Table dialog comes up...
Since we want things (such as images) in our table to sit touching each other without space or gaps, it is very common to set the cell padding and cell spacing properties to zero. It is also common to set the border to zero so that you don't see the borders dividing our tables into cells. After clicking OK with these settings, you will see the outline of the table in Design View as well as some of its properties in the Properties panel...
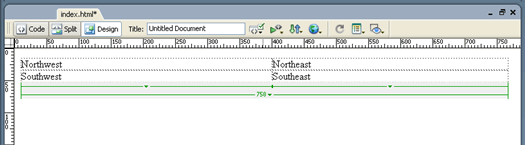
To learn how the HTML code looks for this setup, let us put in some filler text into each cell of our table as shown.
And switch to code view ...
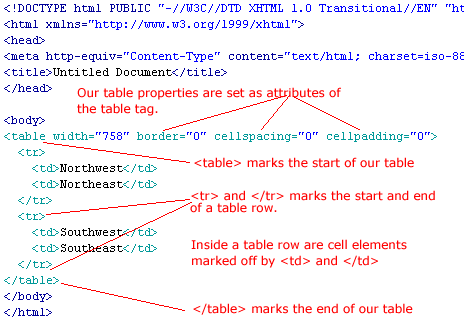
The green HTML code represents our table which starts with the <table> tag and ends with the </table> tag. Anything in between these tags are inside our table. Looking at the start <table> tag, <table width="758" border="0" cellspacing="0" cellpadding="0"> we see that it has extra things known as attributes. For example, we see these four attributes in our table tag... width="758" These attributes represents our table properties. An attribute consists of the attribute name (here it is width), followed by an equal sign, and then followed by the attribute value in quotes (here it is 758). According to the XHTML standard, tag names (such as table) and attribute names (such as border) should always be written in lower case letters. And attribute values should always be in quotes. XHTML also states that one should always specify and attribute value along with an attribute name. In other words -- for those who are familiar with shorthand attributes -- XHTML says not to use them. For example, use ... <input type="checkbox" checked="checked"> instead of <input type="checkbox" checked> Although the browsers will be able to render our page correctly even though we do not strictly obey the XHTML standards. You mind as well learn the correct habit of following the standards. Inside our <table> and </table> tags, we have sets of <tr> and </tr> tags that represents table rows. Inside table rows are table cells (or table data) represented by <td> and </td>. And we see our filler text inside these table cells. By looking at the Split View, we can understand which <td>'s goes with which position in the table.
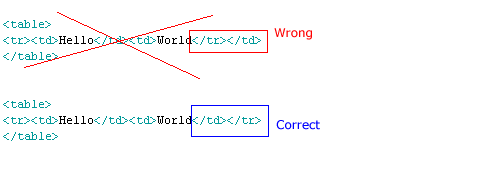
Make sure that you nest your table tags properly. As an example, for example ...
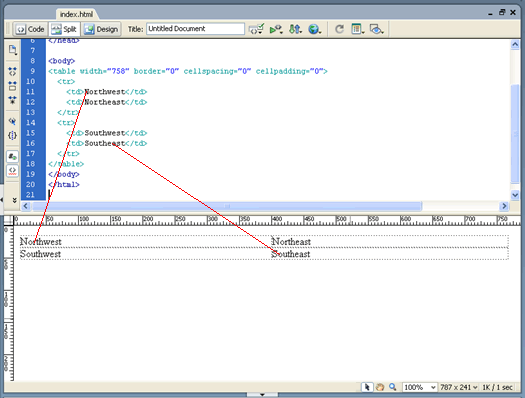
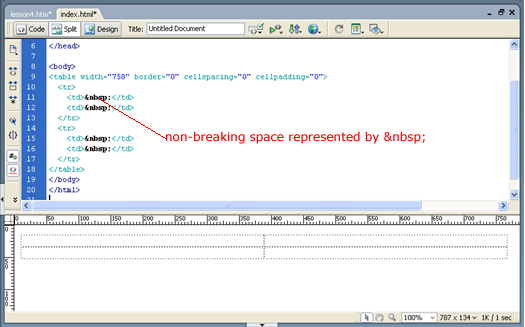
While in Split view, delete our filler text (Northwest, Northeast, Southwest, Southeast) from the bottom graphical view and see that Dreamweaver had put in non-breaking spaces (those things) in between the <td>'s.
That is because browser sometimes will "collapse" empty <td>'s. Think of as just a space character to prop our table up. Continue on to the next lesson, to add our image.
|
 |
 |
| Roadmap | Lessons | Tutorials | Videos | Books | Links | About |
|
|
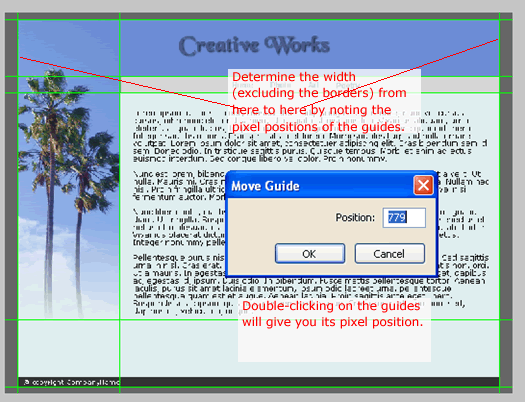
 Make sure guides are set inside the borders.